They say a photo is worth a thousand words. The same applies to screenshots. Whether you want to capture an error and ask someone to check the bug or you want to share something else with your friends, it’s useful to know how you can take a screenshot on Windows 7 in just a few steps. The process is pretty intuitive and doesn’t require any special knowledge. We’ll be showing you step by step what you have to do to take a screenshot in Windows 7 and what necessary image adjustments you should take into account. Windows 8 users, fear not! We have a special upcoming tutorial for you, which will guide you through all the steps you need to follow in order to achieve the perfect screenshot.
Here are all the easy steps you need to follow to capture a screenshot on Windows 7 using the Print Screen key and share it via email or other social media outlets.
- Find the Prt Scrn key, which is usually located on the right side of a keyboard. Standard keyboards will have the button above Home and Insert, while laptop Prt Scrn keys’ placement can vary.
- The next step is pressing the Print Screen button. If you’re using a PC, a single press will be enough, however, some laptops might require a key combination between Prt Scrn and Fn button (Function Key) that you can find on the left corner of your keyboard. Pressing the Print Screen will automatically snap a picture of whatever is open on your screen. The image will be saved in the computer’s memory and will be ready to be pasted in any picture editor.
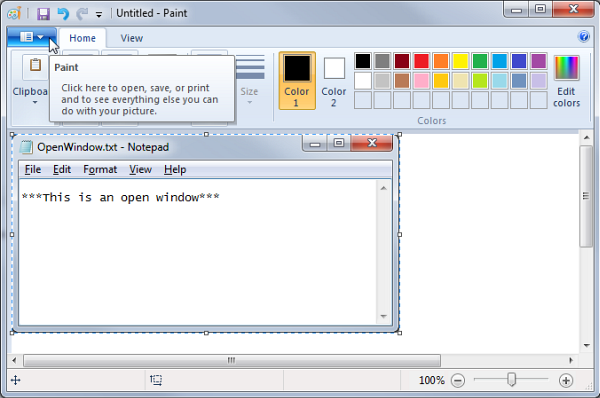
- The simplest image editor to use for pasting the image is Paint. You’ll want to open the program by clicking your Start button and opening the All Programs menu at the bottom. Then you’ll have to open the Accessories folder where you’ll find the program.
- Once Paint is opened, you’ll want to paste the captured picture. You can do this either by pressing the Paste button you can see in Paint’s toolbar or by pressing the key combination Ctrl + V. This will make your screenshot appear in the viewing area.
- You might want to resize or crop the pasted image. Paint is intuitive and you’ll find all the needed buttons on the top side: Rotate, Resize and Crop will help you achieve the image you need.
- When you’re done editing and you have the picture you want to use, click the Save button, name your picture and save the file as a JPEG.
If you’re looking for an alternative to the classic Prt Scr button, you’ll be happy to hear you can capture a screenshot on Windows 7 using another built-in program: Snipping Tool. Quick and easy to use, Snipping Tools has a few more functionalities than the PrtSc and Paint combo, allowing users to capture only portions of the screen, adding annotations and sharing the image. Here are the step by step instructions.
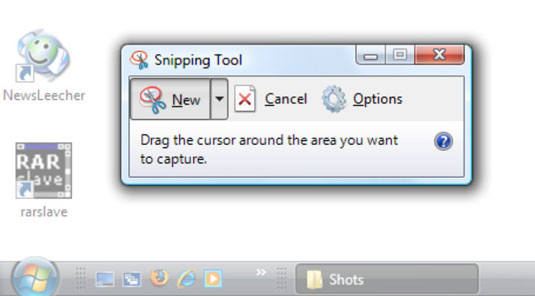
- Open the Snipping Tool by clicking Start, choosing All Programs and going to Accessories.
- A small window will pop up, allowing you to choose from Free-form Snip, Rectangular Snip, Window Snip or Full-screen Snip. The names are self-explanatory. Clicking on any of these options will allow you to take a screenshot of a single open window, or other parts of the screen.
- Once you’ve selected the area you want in your screenshot, Snipping Tool will automatically take you to its editing window.
- The Editing window allows users to add annotations or highlight important parts. The nifty eraser comes in handy if you decide you don’t want to keep certain annotations.
- When you’re happy with the results, you can save the image or send it via email straight from Snipping Tool.
Tips on screenshots optimization
If you’re using screenshots at your job on a daily basis, you need to take into account a few pointers to make the images look better. Here is what you should keep in mind.
- Resizing is not your friend. Whenever you resize a captured screen, the picture becomes blurry. If the screenshot contains a lot of text, you should steer away from resizing, otherwise your recipients will have a difficult time reading it.
- Cropping in a must. Don’t leave any unnecessary images or text in your screenshots. In order to make the picture more compact and enable the viewer to understand what you want to convey, consider eliminating ads or superfluous text.
- Annotations are worth your time. You might be tempted to skip highlighting or annotations, but they’re worth it in the long run. Text comments will make the issue easier to grasp, while circling, highlighting or adding an arrow guide the viewer’s eyes straight to the matter at hand.
- Make your screenshots professional. This translates into cropping the Start bar from your picture and cutting out any personal, sensitive information (email inboxes or browser bookmarks). Consider pasting two screenshots in the same image for a more compact screenshot on Windows 7.